I offer free sag setup for all my customers. However if you want or need to set your sag up yourself, follow this method to assure accuracy.
Step 1: Extend the suspension
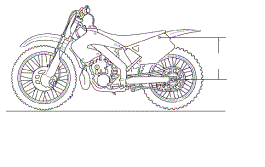
completely by getting the rear wheel off the ground. Make sure the linkage is not hung up on your bike stand. Measure the distance from the axle vertically to some point on
the rear guard. Mark
this reference point because you'll need to refer to it again. This measurement
is your free sag. If the measurement is not exactly vertical the sag numbers will be inaccurate
(too low).
Step 2: Take
the bike off the stand and put the rider on board in a standing position. Have a
third person balance the bike from the front or the rider can balance himself on a wall or something, as long as his full weight is on the foot pegs and the bike is vertical on level ground. If accuracy is important to you,
you must take friction of the linkage into account. Also some Showa shocks have a piston band that is an interferance fit which will give you measurements that differ by 20mm. This is why our
procedure is different: We take two additional measurements. First, push
down on the rear end on the seat and let it extend very slowly. Where it
stops, measure the distance between the axle and the mark on the rear guard
again. If there were no drag in the linkage the bike would come up a
little further. This is measurement 2.
Step 3: Have
your assistant lift the rear of the bike by pushing up on the sub frame without pulling on the rear guard which would move your reference point and let it down very
slowly. Where it stops, measure it. If there were no drag it would drop a little
further. This is measurement 3.
Step 4: The
spring sag is in the middle of these two measurements. In fact, if there were
no drag in the linkage or shock piston, measurements 2 and 3 would be the same. To get the actual sag figure
you find the midpoint by averaging the two numbers and subtracting them from
the fully extended free sag measurement.This is now your rider sag.
Step 5: Adjust
the preload with whatever method applies to your bike. Spring collars are common,
and some benefit from the use of special tools. In a pinch you can use a blunt
chisel to unlock the collars and turn the main adjusting collar. If you have
too much sag you need more preload; if you have too little sag you need less
preload.
Most off road bikes need between 95 and 105mm rider sag depending on the bike and the ride characteristics required.
Full size KTM's work better with sag of 110 +/- 5mm.


 Step 1: Extend the suspension
completely by getting the rear wheel off the ground. Make sure the linkage is not hung up on your bike stand. Measure the distance from the axle vertically to some point on
the rear guard. Mark
this reference point because you'll need to refer to it again. This measurement
is your free sag. If the measurement is not exactly vertical the sag numbers will be inaccurate
(too low).
Step 1: Extend the suspension
completely by getting the rear wheel off the ground. Make sure the linkage is not hung up on your bike stand. Measure the distance from the axle vertically to some point on
the rear guard. Mark
this reference point because you'll need to refer to it again. This measurement
is your free sag. If the measurement is not exactly vertical the sag numbers will be inaccurate
(too low).
 Step 4: The
spring sag is in the middle of these two measurements. In fact, if there were
no drag in the linkage or shock piston, measurements 2 and 3 would be the same. To get the actual sag figure
you find the midpoint by averaging the two numbers and subtracting them from
the fully extended free sag measurement.This is now your rider sag.
Step 4: The
spring sag is in the middle of these two measurements. In fact, if there were
no drag in the linkage or shock piston, measurements 2 and 3 would be the same. To get the actual sag figure
you find the midpoint by averaging the two numbers and subtracting them from
the fully extended free sag measurement.This is now your rider sag.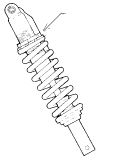 Step 5: Adjust
the preload with whatever method applies to your bike. Spring collars are common,
and some benefit from the use of special tools. In a pinch you can use a blunt
chisel to unlock the collars and turn the main adjusting collar. If you have
too much sag you need more preload; if you have too little sag you need less
preload.
Step 5: Adjust
the preload with whatever method applies to your bike. Spring collars are common,
and some benefit from the use of special tools. In a pinch you can use a blunt
chisel to unlock the collars and turn the main adjusting collar. If you have
too much sag you need more preload; if you have too little sag you need less
preload.